How to Migrate the Contract

Introduction
In NEAR, the smart contract is stored in the state of the Account. We learned from the Account Model tutorial that only one account can be deployed and activated per account. If we want to change a contract that has already been deployed, what should we do? This tutorial takes a look at various ways to update smart contracts that have already been deployed and has hands-on contract migration exercises using the WELLDONE Code.
Updating Contracts
During the development, and sometimes even in production, updates to a contract’s code (or even data) are needed. If you are in the local development environment, you can simply deploy an updated contract to a new account, but the downside is that you cannot use the data from the previously deployed contract as it is. Therefore, if you want to keep the data from previously deployed contracts, or if you have already deployed contracts to the mainnet and are operating the service, you should use the method of migrating contracts deployed to your existing account.
Let’s now look at three ways to update your contract.
Re-deploy another contract
You can update contracts by simply redeploying them to the new account if you don't need to maintain the previously deployed contracts’ state. You can easily create a new dev-account and deploy the contract using NEAR CLI’s dev-deploy command in the testnet. If you want to use the same account ID you used before, delete the account and create an account with the same name again. When an account is deleted, data from an existing contract is also deleted, so you can get the same effect as deploying the contract to the new account.
To deploy the contract to dev-account, you must install NEAR CLI first.
near dev-deploy --wasmFile [route_to_wasm]
The above command automatically creates a new testnet Account with the prefix dev- and deploys the contract to that account. The generated dev-account information is stored in the neardev folder of the current location, and the private key is stored in the ~/.near-credentials folder.
If the neardev folder already exists, the dev-deploy command will deploy contracts to the current dev-account rather than creating a new account. As a result, if you want to create a new dev-account and deploy the contract again after modifying it, you must delete the neardev folder first.
Next, let's see how to deploy contracts by deleting existing account and recreating account with the same name. The NEAR CLI is also used for this method. Let's say you wish to update an existing contract that is now deployed to sub-account named app-name.you.testnet.
First, delete app-name.you.testnet where existing contract was deployed. Please be aware that in order to delete an account, you must have the account's Full Access Key.
near delete app-name.you.testnet you.testnet
If you run the above command, app-name.you.testnet will be deleted, and the token remaining in the account will be sent to you.testnet and the data of the contract deployed to that account is also deleted.
Then, create a sub-account with the same name again and deploy the modified contract to that account.
near create-account app-name.you.testnet --masterAccount you.testnet
near deploy --accountId app-name.you.testnet --wasmFile [route_to_wasm]
Since all of the contract data in the account will be deleted if you delete and recreate the account, doing it this way will have the effect of deploying the contract for the first time.
Migrating the State
If you want to redeploy the updated smart contract in the same Account while keeping the previous contract’s data, you need a method to migrate the smart contract’s state.
Why can't we simply redeploy the updated contract to the account where the previous contract was deployed? The smart contract of NEAR is stored in the Account’s state separately in code (logic) and state (storage). So, If you redeploy the contract to the account, the contract’s code will change but the contract’s state will remain the same.
When your contract is executed, the NEAR Runtime reads the serialized state from the disk and attempts to load it using the current contract code. If the contract code has a different state than the already deployed one, the Cannot deserialize the contract state error occurs. Therefore, if you modify the state of the contract, you need a migration method to read the status of the previous contract state.
The migration method implements following:
- Reads the current state of the contract
- Applies different functions to transform it into the new state
- Returns the new state
Let's take a closer look at the example using the migration method in the practice part using the WELLDONE Code.
Programmatic Update
There is a way to implement a method that allows smart contract updates by itself. It is usually used by deploying smart contract code that implements that method, and then deleting all Full Access Keys in the account where the smart contract was deployed. This clearly shows that no one outside, including the developer, can’t modify the smart contract. When all Full Access Keys in the account are deleted, the account is said to be locked. Only the smart contract itself can update the contract in this case.
This method ensures that malicious updates do not occur without users consent, as the contract update process is transparent to all dApp users.
A smart contract can also update itself by implementing a method that:
- Takes the new wasm contract as input
- Creates a
Promiseto deploy it on itself
pub fn update_contract(&self) -> Promise {
    // Check the caller is authorized to update the code
    assert!(env::predecessor_account_id() == self.manager, "Only the manager can update the code");

    // Receive the code directly from the input to avoid the
    // GAS overhead of deserializing parameters
    let code = env::input().expect("Error: No input").to_vec();

    // Deploy the contract on self
    Promise::new(env::current_account_id())
    .deploy_contract(code)
    .function_call(
        "migrate".to_string(),
        NO_ARGS,
        0,
        CALL_GAS
    )
    .as_return()
}
See full example on Github. There is also an JavaScript example.
Get your Hands Dirty on WELLDONE Code
Now, let's practice how to write the migration method to update smart contracts written as Rust in the WELLDONE Code.
- Please create a NEAR testnet account in WELLDONE Wallet referring to the manual in docs. You need a certain amount of NEAR testnet tokens.
- The purpose of this part is to practice contract migration. Please refer to the Code Docs or dApp development tutorial for basic connection and usage of WELLDONE Code.
First, let's take a quick look at the contract we're going to use. This contract is a contract called GuestBook, which stores a vector array of structures called PostedMessage and a vector array of Balance in a state. The method includes add_message to add a message, get_message to read stored messages, and get_payments to read payments. The complete code for the contract can be found in the following repository.
#[near_bindgen]
#[derive(BorshDeserialize, BorshSerialize, Serialize)]
#[serde(crate = "near_sdk::serde")]
pub struct PostedMessage {
    pub premium: bool,
    pub sender: AccountId,
    pub text: String,
}

#[near_bindgen]
#[derive(BorshDeserialize, BorshSerialize)]
pub struct GuestBook {
    messages: Vector<PostedMessage>,
    payments: Vector<Balance>,
}
Deploy the Contract
Now, let’s go to WELLDONE Code and deploy the GuestBook contract first.
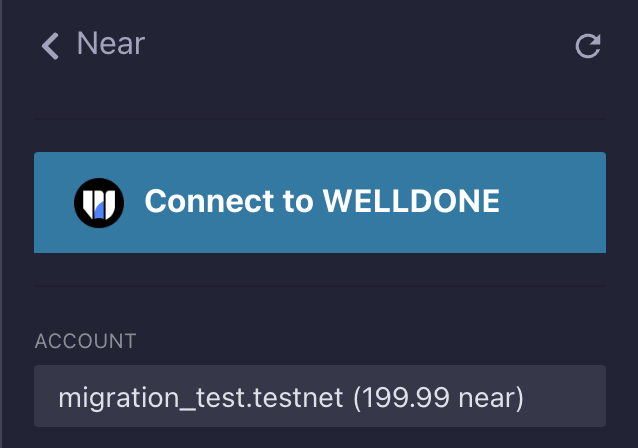
Go to NEAR section and Connect to WELLDONE.
The connected account should be the account we will deploy the contract to. Please create a new account that has never deployed contracts before and connect to it.
In the Project section, select Rust option and write a project’s name in Project section then click the New Project button.
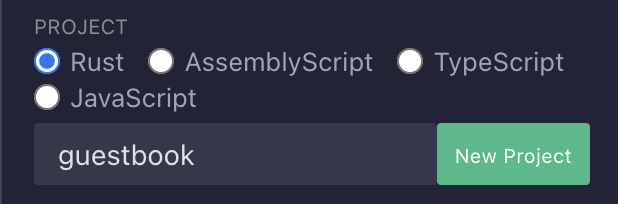
A project structured with the same name will be created in the
nearfolder if you open File Explorer.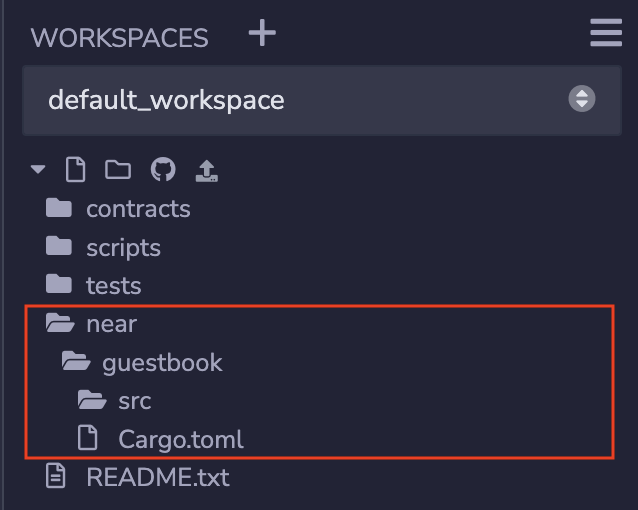
Copy and paste the code below.
- Cargo.toml
[package]
name = "guestbook"
version = "1.0.0"
authors = ["Near Inc <hello@near.org>"]
edition = "2021"

[lib]
crate-type = ["cdylib"]

[dependencies]
near-sdk = "4.0.0"
uint = { version = "0.9.3", default-features = false }- src/lib.rs
use near_sdk::borsh::{self, BorshDeserialize, BorshSerialize};
use near_sdk::collections::Vector;
use near_sdk::json_types::U128;
use near_sdk::serde::Serialize;
use near_sdk::{env, near_bindgen, AccountId, Balance};
const POINT_ONE: Balance = 100_000_000_000_000_000_000_000;
#[near_bindgen]
#[derive(BorshDeserialize, BorshSerialize, Serialize)]
#[serde(crate = "near_sdk::serde")]
pub struct PostedMessage {
pub premium: bool,
pub sender: AccountId,
pub text: String,
}
#[near_bindgen]
#[derive(BorshDeserialize, BorshSerialize)]
pub struct GuestBook {
messages: Vector<PostedMessage>,
payments: Vector<Balance>,
}
impl Default for GuestBook {
fn default() -> Self {
Self {
messages: Vector::new(b"m"),
payments: Vector::new(b"p"),
}
}
}
#[near_bindgen]
impl GuestBook {
#[payable]
pub fn add_message(&mut self, text: String) {
let payment = env::attached_deposit();
let premium = payment >= POINT_ONE;
let sender = env::predecessor_account_id();
let message = PostedMessage {
premium,
sender,
text,
};
self.messages.push(&message);
self.payments.push(&payment);
}
pub fn get_messages(&self, from_index: Option<U128>, limit: Option<u64>) -> Vec<PostedMessage> {
let from = u128::from(from_index.unwrap_or(U128(0)));
self.messages
.iter()
.skip(from as usize)
.take(limit.unwrap_or(10) as usize)
.collect()
}
pub fn get_payments(&self, from_index: Option<U128>, limit: Option<u64>) -> Vec<U128> {
let from = u128::from(from_index.unwrap_or(U128(0)));
self.payments
.iter()
.skip(from as usize)
.take(limit.unwrap_or(10) as usize)
.map(|x| U128(x))
.collect()
}
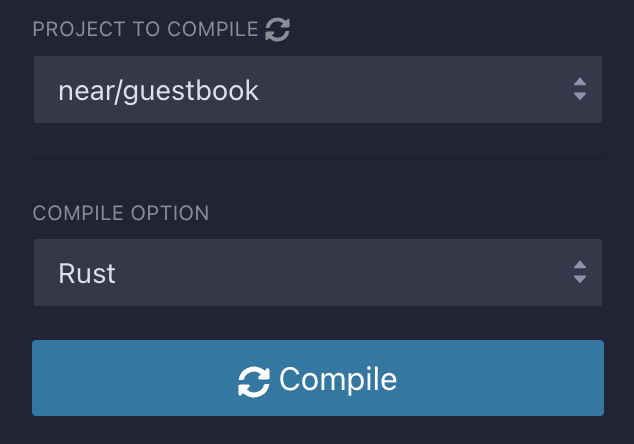
}Compile the contract.
Select Rust compile option and click the Compile button. The wasm file is returned after the compilation is complete.
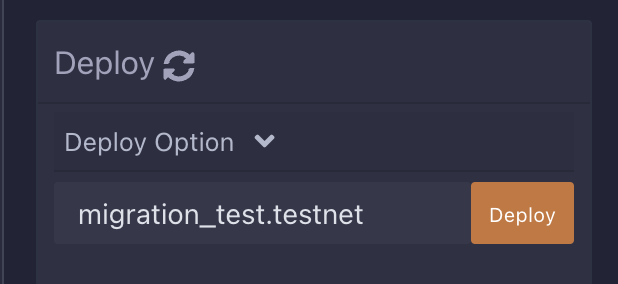
Deploy the Contract.
When the compilation is complete, the Deploy section automatically appears below. Enter the ID of the account for which you want to deploy contracts, and then click the Deploy button. This requires interaction with the WELLDONE Wallet.
Execute the contract.
You can see the deployed contract after the deployment is complete. Run the
add_messagesmethod to check the contract is deployed well. The value passed in the text field becomes a message, and the amount of tokens passed in the deposit becomes payments. Becauseadd_messagesis the call method, click the Call button to run the method.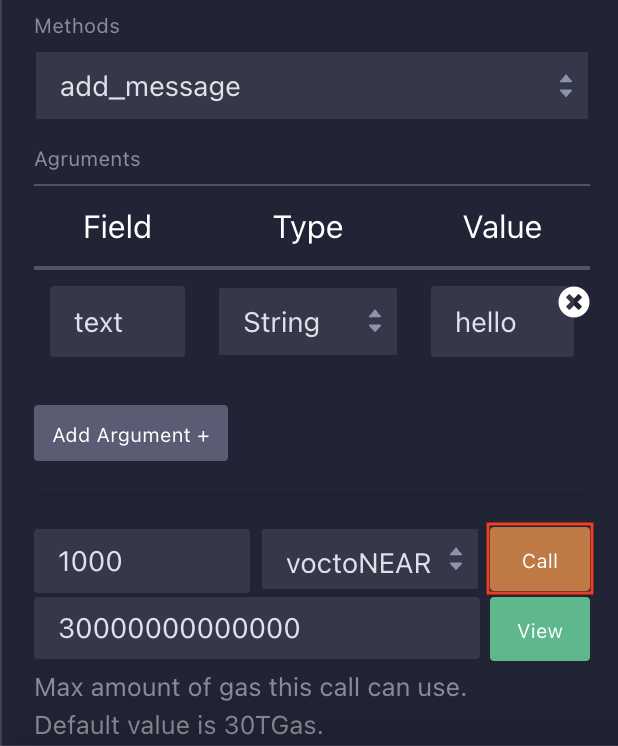
If the transaction is successful, run the
get_messagesorget_paymentsview methods to confirm that the previously added massages and payments values are returned.

Writing a Migration Method
Let's assume that we want to change the state of the contract we deployed as follows. Previously, payments were saved in GuestBook, but after the change, payments will be managed together in PostedMessage. We know that when the status of the smart contract is changed like this, the Cannot deserialize the contract state error will occur if the contract is redeployed into the same account.
#[near_bindgen]
#[derive(BorshDeserialize, BorshSerialize, Serialize)]
#[serde(crate = "near_sdk::serde")]
pub struct PostedMessage {
    pub payment: u128,
    pub premium: bool,
    pub sender: AccountId,
    pub text: String,
}

#[near_bindgen]
#[derive(BorshDeserialize, BorshSerialize)]
pub struct GuestBook {
    messages: Vector<PostedMessage>,
}
To solve this problem, we need to add the migration method to the updated contract.
Again, the migration method implements following:
- Reads the current state of the contract
- Applies different functions to transform it into the new state
- Returns the new state
In other words, you need to write a method to iterate through the old GuestBook state and convert them to a new PostedMesage struct(payment, premium, sender, text).
Please create a new file called src/migrate.rs and paste the codes below.
use crate::*;

#[near_bindgen]
#[derive(BorshDeserialize, BorshSerialize, Serialize)]
#[serde(crate = "near_sdk::serde")]
pub struct OldPostedMessage {
    pub premium: bool,
    pub sender: AccountId,
    pub text: String,
}

#[derive(BorshDeserialize, BorshSerialize)]
pub struct OldState {
    messages: Vector<OldPostedMessage>,
    payments: Vector<Balance>,
}

#[near_bindgen]
impl GuestBook {
    #[private]
    #[init(ignore_state)]
    pub fn migrate() -> Self {
        // retrieve the current state from the contract
        let old_state: OldState = env::state_read().expect("failed");

        // iterate through the state migrating it to the new version
        let mut new_messages: Vector<PostedMessage> = Vector::new(b"p");

        for (idx, posted) in old_state.messages.iter().enumerate() {
            let payment = old_state.payments.get(idx as u64).unwrap_or(0);

            new_messages.push(&PostedMessage {
                payment,
                premium: posted.premium,
                sender: posted.sender,
                text: posted.text,
            })
        }

        // return the new state
        Self {
            messages: new_messages,
        }
    }
}
Also modify the src/lib.rs to the updated version of contact as below.
use near_sdk::borsh::{self, BorshDeserialize, BorshSerialize};
use near_sdk::collections::Vector;
use near_sdk::json_types::U128;
use near_sdk::serde::Serialize;
use near_sdk::{env, near_bindgen, AccountId, Balance};

mod migrate;

const POINT_ONE: Balance = 100_000_000_000_000_000_000_000;

#[near_bindgen]
#[derive(BorshDeserialize, BorshSerialize, Serialize)]
#[serde(crate = "near_sdk::serde")]
pub struct PostedMessage {
    pub payment: u128,
    pub premium: bool,
    pub sender: AccountId,
    pub text: String,
}

#[near_bindgen]
#[derive(BorshDeserialize, BorshSerialize)]
pub struct GuestBook {
    messages: Vector<PostedMessage>,
}

impl Default for GuestBook {
    fn default() -> Self {
        Self {
            messages: Vector::new(b"m"),
        }
    }
}

#[near_bindgen]
impl GuestBook {
    #[payable]
    pub fn add_message(&mut self, text: String) {
        let payment = env::attached_deposit();
        let sender = env::predecessor_account_id();
        let premium = payment >= POINT_ONE;
        let message = PostedMessage {
            payment,
            sender,
            premium,
            text,
        };
        self.messages.push(&message);
    }

    pub fn get_messages(&self, from_index: Option<U128>, limit: Option<u64>) -> Vec<PostedMessage> {
        let from = u128::from(from_index.unwrap_or(U128(0)));

        self.messages
            .iter()
            .skip(from as usize)
            .take(limit.unwrap_or(10) as usize)
            .collect()
    }
}
Here we should note that the migration method is the initialization method. This is the method that must be executed first before other methods in the contract are executed, and only once. If you run another method before executing the 'migration' method, the Cannot deserialize the contract state error will occur the same way.
Re-deploy the Contract
Now, let’s redeploy the updated contract to the same account.
Compile the modified contract again.
Delete the
outfolder of the project and click the Compile button. If you do not delete the out folder, the error logIf you want to run a new compilation, delete the 'out' directory and click the Compile button again.will be printed on the terminal.
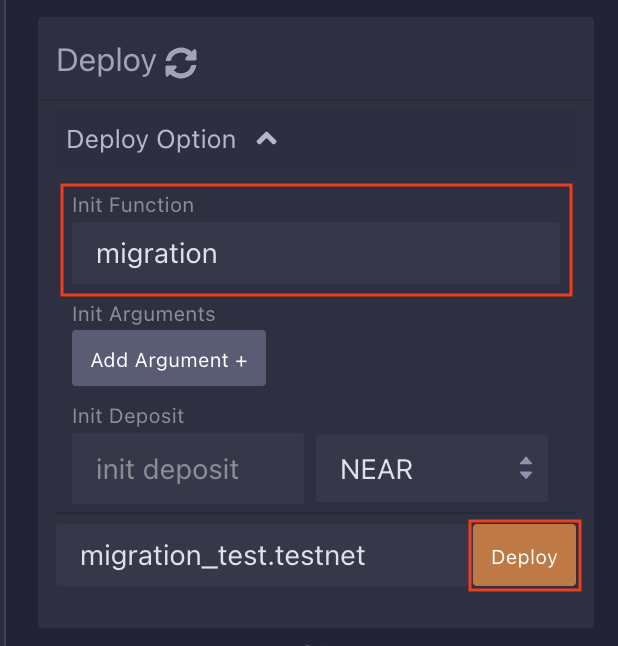
Specify the
migrationmethod as an Init function and proceed with redeployment.A modal window will appear asking the user for their agreement once more because the account already has a contract deployed. Press the YES button to proceed with the deployment.

Execute the contract.
When the contract deployment is complete, it automatically show the updated contract. By running the
get_messagesmethod, you can see that the previously stored information is well converted into a newly updated structure and outputs it.
Wrap-Up
In this tutorial, we learned how to update the contract that has already deployed to account and had hands-on contract migration exercises using the WELLDONE Code.
Here’s how to update a contract that already have been deployed to account:
- Deploy to a new account
- Using a migration method
- Using a programmatic update
We hope this tutorial will help those who are curious about how to maintain the smart contract in NEAR. Thank you for reading!
Reference
https://docs.near.org/develop/upgrade
https://docs.near.org/concepts/web3/near#contract-upgrades
https://docs.near.org/develop/contracts/serialization#deserialization-error